An Opinionated Tutorial on ROS Node Design
Fluency with ROS is essential for doing robotics. A lot of the students I’ve worked with in the past have no problem getting through the ROS tutorials, but start to flounder as soon as they need to create their first ROS node. My goal with this tutorial is to introduce a few techniques that make writing ROS nodes easier. I’m going to assume that you’ve installed ROS Kinetic on an Ubuntu system, and have at least looked at the beginner ROS tutorials. Also, since C++ is primary language for doing robotics at the moment, this tutorial is focused on C++ development. I’ll cover the following topics to give you a template for developing your own nodes:
- Working with bag files
- Using classes to represent ROS nodes.
- Working with configuration files
- ROS timers
To show these concepts in action, the example robot we’re going to use is my team’s Lincoln MKZ:

The ROS node we will look at computes the total distance traveled by my team’s car as it travels along Mayberry Drive in Reno, Nevada:

The car has a GNSS system that gives us position and velocity information at a relatively high frequency (100 Hz), and we’re going to integrate that information along the path the car travels to get the total distance traveled. This is a toy problem, but still useful enough to be interesting; we use a similar node to keep track of how many miles our car has driven autonomously.
Getting Started: Data and Code
You should be able to run all of the code in this tutorial. To do so, you’re going to need to download two ROS packages and one bagfile containing a recording of the car’s trip.
Getting the bagfile
One very cool feature of ROS is that it allows you to record
bagfiles while you run your robot. This is essentially a recording
of all the messages sent and received on your robot as long as the
rosbag recorder is running. You should get into the habit of recording
bagfiles as often as possible, because they are essential for
debugging and development. I drove our car along Mayberry in manual
mode and recorded the GNSS data, the vehicle data, and the data from
one of our Velodyne VLP-16 lidar units using rosbag record. The
result is a file named 2018-09-05-21-12-15.bag. Because of the lidar
data, this bagfile is large - about 11GB. Keep that in mind before
downloading the file at this link:
Once you have this file, you can run the following two commands (in
separate terminals) to play back the recorded trip (the $ indicates
a new terminal prompt):
$ roscore
$ rosbag play -l --pause 2018-09-05-21-12-15.bag
A few things to note here:
The -l option causes playback to loop once the end of the file is
reached. The --pause option causes the playback to start in a
paused state. You can then either step through playback by repeatedly
hitting s or you can start normal playback by hitting the space bar.
Once you’ve started playing back the file, you can open rviz and see
the point cloud:
$ rosrun rviz rviz
Add a new display by topic, add the appropriate point cloud topic, and
change the fixed frame to velodyne and you should see the point
cloud:
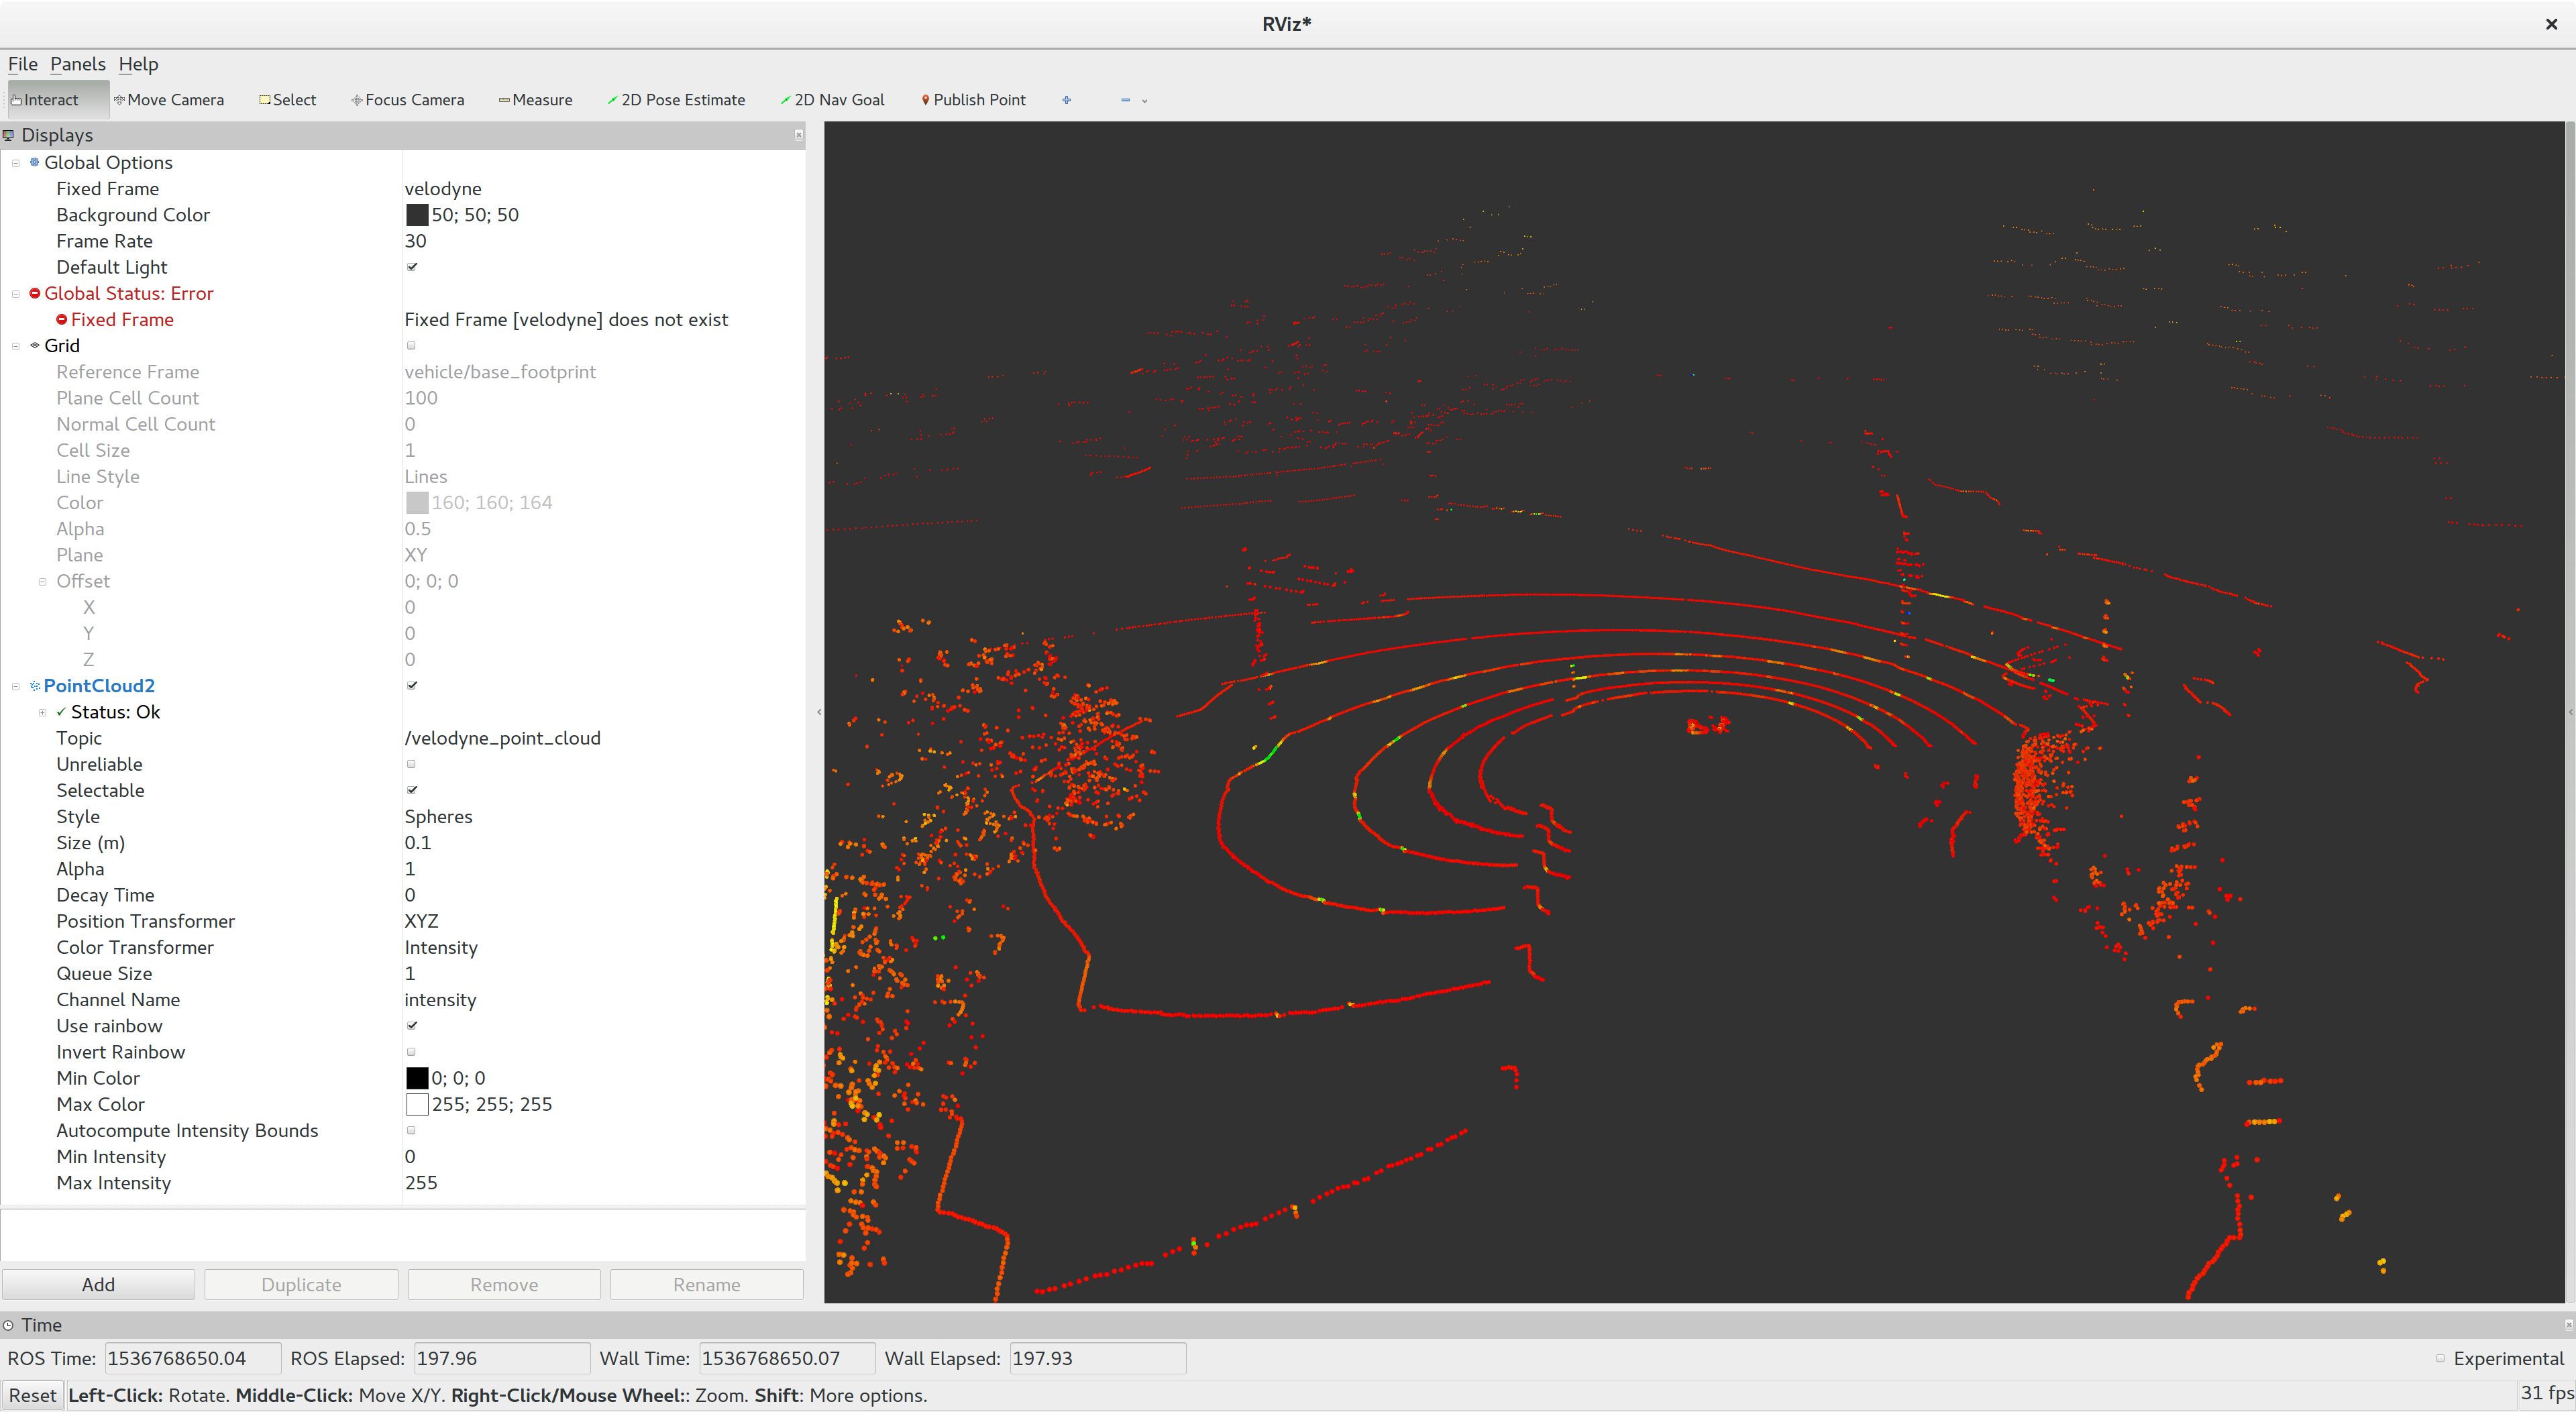
Try copying the settings on the left if you’re having trouble getting the cloud to show up. Once you’re able to visualize this cloud, you’re ready to download the two packages we need to start looking at code.
Getting the packages
Before you download the packages, you need to create a catkin workspace. If you’ve gone through the ROS tutorials, you’ve done this already. Just so we’re on the same page, here are the commands I ran on my machine to generate a workspace:
$ mkdir tutorial0_ws
$ cd tutorial0_ws
$ mkdir src
$ cd src
$ catkin_init_workspace
$ cd ..
$ catkin_make
The last command, catkin_make, isn’t strictly necessary, but is
useful for catching system configuration problems. In particular, I
use anaconda to manage my Python workflows for machine learning. ROS
assumes that you’re running the Ubuntu system Python, so I usually
disable anaconda’s Python before starting to work on ROS (this is a
huge pain, and if you have solved this problem I would love to know
how). Running catkin_make on an empty workspace is a quick way to
isolate the “wrong version of python” problem when starting a new
project like this.
Once catkin_make runs without error, you’ll want to put two packages
into the src directory of your workspace. The first package you’re
going to need is my ROS port of Baidu’s Novatel driver:
This is necessary to be able to read the messages that our GNSS system produces. We only need the message definitions here; we don’t really care about the driver code for this tutorial.
The second package we need is the tutorial code itself:
This is the package whose code we’ll look at. To get these packages,
the commands to run (within src) are:
$ git clone https://www.github.com/richardkelley/gnss_driver.git
$ git clone https://www.github.com/richardkelley/odom_integrator.git
Once these commands are done, you can build the workspace. Assuming
you’re still in src, you should run the following:
$ cd ..
$ catkin_make
This should build both packages in the correct order. To be able to
run the odom_integrator node you’ll need to source the workspace’s
setup.bash file. To do so, make sure you’re in tutorial0_ws and run
$ source devel/setup.bash
(Remember that whenever you open a new terminal to work with
odom_integrator, you’ll need to run this command.) Once the code is
building and you’ve sourced the workspace’s setup.bash file, you can
see the node in action by opening a new terminal and running
$ rosrun odom_integrator odom_integrator_node
Once that’s running, in a new terminal run the following command:
$ rostopic echo -c /odom_integrator/distance
The -c option clears the screen each time a new message is received,
rather than just scrolling and making a mess of your terminal. You
should see the distance traveled incrementing in your terminal. If you
compare this number with the motion of the point cloud in Rviz, you’ll
see that the number changes faster or slower as the car speeds up and
slows down - a good sanity check on the system’s behavior. If you run
rosbag play without the -l command, you should see that the car
travels approximately 4.6 kilometers from the start of the recording
to the end.
Now that you have the
odom_integrator_node running, it’s time to look at the code that’s
computing the distance traveled.
The odom_integrator Package
To understand how odom_integrator produces that number, we’re going
to walk through the code in that package. Start by running the tree
command (you may need to run sudo apt install tree to install this):
$ roscd odom_integrator
$ tree .
The tree command should produce output that looks like this:
.
├── CMakeLists.txt
├── conf
│   └── conf.yaml
├── include
│   └── odom_integrator
│       └── odom_integrator.h
├── package.xml
└── src
    ├── odom_integrator.cpp
    └── odom_integrator_node.cpp

4 directories, 6 files
We’ll start by looking at the main function, in
src/odom_integrator_node.cpp. This is a short file, but there are
two interesting things going on in it. First, we’re using
ros/package.h to get the path to a configuration file in a portable
way. Second, we’re going to use a class to contain the state and
callbacks of our ROS node.
Working with paths in ROS
Working with directories in ROS is actually pretty easy. You need one
#include and one function call. The #include is on line 13 of
odom_integrator_node.cpp:
#include <ros/package.h>
and the function call is on line 25:
std::string path = ros::package::getPath("odom_integrator");
The result is that the variable path holds the path to the package
odom_integrator (in this case, the current package). Because ROS
tries hard to separate itself from Ubuntu’s directory structure, this
function is probably the only way to make sure your code works without
recompiling across multiple machines. Once we have the path to the
package, we can specify the full path of the configuration file we’ll use:
std::string full_path = path + "/conf/conf.yaml";
We then pass this full path into the constructor for our node class.
Using classes to represent ROS nodes
Looking at main, you probably noticed that it contains none of the
“usual” declarations you expect in ROS: there’s no NodeHandle, there
are no Publisher or Subscriber objects, etc. That’s because the
proper way to manage those objects in C++ is via a class. Look at
the end of main:
odom_integrator::OdomIntegratorNode node{full_path};

ros::spin();
Here, we pass full_path into the constructor of an
OdomIntegratorNode, and then let ROS go. It doesn’t look like node
is doing any work here, but because we declare our callbacks and
publishers as member functions of OdomIntegratorNode, all we need to
do is create our node object, initialize the ROS-relevant objects in
the constructor, and let the process go. This allows your callbacks to
share data without the use of unnecessary global variables, and also
uses the C++ idiom of RAII (“Resource Acquisition is
Initialization”)
to ensure that any resources you acquire will be cleaned up when the
object representing the node is cleaned up. That doesn’t really matter
in a node as simple as this one, but in complex ROS nodes that manage
resources (and in general C++ programming) this is an approach you
should probably almost always use.
To see how we structure our class, let’s look at odom_integrator.h
in include/odom_integrator. First, note the use of the namespace
odom_integrator wrapping our class. Namespaces prevent name
collisions, and as you write more complicated systems based on ROS,
you should use namespaces like this to ensure that these conflicts
don’t occur.
Here’s the full class:
  class OdomIntegratorNode {
  public:

    OdomIntegratorNode(const std::string& filename);

    void gnss_callback(const gnss_driver::GpsConstPtr& gps_msg);
    void timer_callback(const ros::TimerEvent& event);

  private:

    bool load_configuration(std::string filename);

    ros::NodeHandle nh_;
    ros::Subscriber gnss_odom_sub_;
    ros::Publisher distance_traveled_pub_;
    ros::Timer distance_traveled_timer_;

    std::string conf_filename_;

    gnss_driver::Gps last_odom_;

    bool use_position_ = false;
    bool first_ = true;
    double distance_traveled_ = 0.0;
  };
We make the constructor and our two ROS callbacks public member
functions, and we make our NodeHandle and our ros::Publisher,
ros::Subscriber, and ros::Timer private member variables. We then
initialize these variables in the class’s sole constructor. Opening
src/odom_integrator.cpp, you can see how this works:
  OdomIntegratorNode::OdomIntegratorNode(const std::string& filename)
    : conf_filename_{filename} {

    gnss_odom_sub_ = nh_.subscribe<gnss_driver::Gps>("/gnss_driver/odometry", 1,
						     &OdomIntegratorNode::gnss_callback,
						     this);

    distance_traveled_pub_ = nh_.advertise<std_msgs::Float64>("/odom_integrator/distance", 10);

    distance_traveled_timer_ = nh_.createTimer(ros::Duration(0.1),
					       &OdomIntegratorNode::timer_callback,
					       this);

    load_configuration(filename);

  }
If you’ve worked with publishers and subscribers in ROS before, the
only thing that may stand out as unusual here is the list of arguments
we pass to subscribe. Because our callback
(OdomIntegratorNode::gnss_callback) is a member function, we have to
pass both a pointer to the function (the third argument) and a pointer
to the object whose member function we want to call (the pointer
this).
We follow the same pattern in createTimer. If you haven’t seen ROS
timers before, it’s worth taking a look at this function call and the
corresponding OdomIntegratorNode::timer_callback. Timers behave like
subscribers, except that they receive ros::TimerEvent objects on a
regular schedule specified by the first argument to createTimer. In
this case, we’re going to call OdomIntegratorNode::timer_callback at
10 Hz. Timers are extremely useful, especially for things like
planning and control loops that need to run at a set frequency.
The actual callbacks are the same here as you would write them in the style of the official tutorials. Once you have the skeleton of your program in place using a class to organize everything, all you have to do is write the code to solve robotics, or whatever ;)
ROS and YAML
The last line of the OdomIntegratorNode constructor is a call to
load_configuration. Let’s look at the body of that function:
  bool OdomIntegratorNode::load_configuration(std::string filename) {
    std::cerr << "Loading configuration: " << filename << std::endl;

    YAML::Node c = YAML::LoadFile(filename);

    if (c.Type() != YAML::NodeType::Map) {
      ROS_ERROR("Invalid configuration.");
      return false;
    }

    if (c["odom_type"].as<std::string>() == "pos") {
      ROS_INFO("Using position-based odometry.");
      use_position_ = true;
    } else if (c["odom_type"].as<std::string>() == "vel") {
      ROS_INFO("Using velocity-based odometry.");
      use_position_ = false;
    } else {
      ROS_ERROR("Unknown odometry type requested.");
      return false;
    }
  }
We are going to give users of our node two ways to compute the
distance traveled (this is a bit artificial, but shows off YAML usage
in a mildly interesting way). The first option will be to look at the
consecutive position estimates returned by GNSS, compute the distance
between these estimates, and add all of the increments. The second
option will be to use the velocity estimates (also returned by
GNSS). We’ll get the time difference dt between consecutive
estimates (which will be small, because the GNSS driver runs at 100
Hz), multiply that dt by the norm of the velocity vector, and add up
the result over time, essentially approximating the integral
definition of arc
length. Rather
than force users to recompile the node to switch between these
computations, we’ll use a YAML file. YAML is the “preferred” ROS
method for specifying configuration information, and is (almost) built
into ROS itself. Let’s look at the file conf/conf.yaml:
---
odom_type: pos
This is a single pair that specifies that the key odom_type maps to
the value pos. Looking at load_configuration above you can see
that there are two valid options: pos and vel. Changing between
these two values in conf.yaml will cause use_position_ to change
between true and false, which will in turn cause
OdomIntegratorNode::gnss_callback to switch between the two distance
computations described above. Incidentally, this function also shows
the two ways to print information to the terminal in ROS nodes
(namely, using std::cerr and the ROS_INFO-style printing
functions).
CMake Gotchas
As I mentioned above, ROS uses YAML for most of its internal
configuration, and YAML is almost built into ROS. You’ll notice in
odom_integrator.cpp that we used the following #include to get
access to YAML:
#include <yaml-cpp/yaml.h>
We don’t have to do anything special to be able to reference this
header, but if you don’t explicitly link to the YAML libraries, your
node won’t compile. In CMakeLists.txt, you need to specify that
linking as follows:
target_link_libraries(${PROJECT_NAME}_node
  ${catkin_LIBRARIES}
  yaml-cpp
)
That yaml-cpp is necessary. This is an annoying extra step, but such
is life.
While we’re on the topic of CMake, it’s also probably a good
idea to get in the habit of including the following line in your
CMakeLists.txt:
add_compile_options(-std=c++14)
When you create a new ROS node, a similar line appears in the file by
default (-std=c++11 instead of -std=c++14), but is commented
out. Unless you have an extremely good reason to do otherwise, you
should uncomment the line and change the 11 to a 14. This won’t break
your builds, and it will give you access to modern C++, which you
really should be using. Advantages of C++14 over C++11 are: better
type inference, more powerful lambdas, and the C++ folks finally
remembered to put make_unique into the standard library.
Conclusion
Robotics programming with ROS can be hard, but you can develop habits to make it easier. Hopefully this tutorial is enough to get you started writing your own ROS nodes in modern C++, which will let you focus more on the robotics problems you’re trying to solve instead of contemplating proper ROS design. Most of the items we covered here are a good idea to include in your own development. Even if you don’t write your nodes this way, the patterns are common enough that you’ll probably encounter them reading other people’s code.
The odom_integrator package is only a few hundred lines of code, but
this tutorial didn’t go over every line that makes up the node. Dig
through the code on Github, run it yourself, and play around until
you’re comfortable making use of these ideas in your own work.
I would love your help making this post better. If you have questions or suggestions, please send them my way.